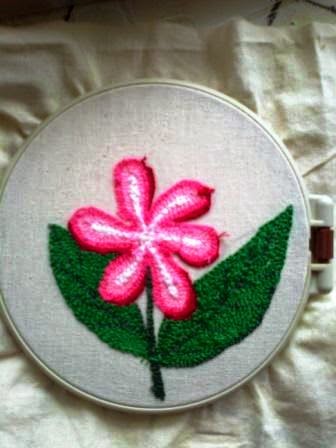
Итак, у меня есть готовая вышивка в ковровой технике - розовый цветок (о ней я писала здесь), в коробке с тканями нашлась плащёвка подходящего цвета, а в магазине "Лоскут" застёжка-молния, атласная лента и косая бейка. Немного поискав, нашла ткань для подклада- обычный синий хлопок и плёнку для жёсткости. Вместо плёнки можно использовать картон, пластик, да всё что подойдёт и придумается.
So, I have finished the embroidery in the carpet technique pink flower (that I wrote herehttp://crepalnitsa.blogspot.ru/2014/05/russian-punchneedle-embroidery.html), in a box of tissues was raincoat fabric suitable colour, and in shop "Flap" zipper, satin ribbon and bias binding. A little searching, I found the material for lining - regular blue cotton and film for rigidity. Instead of film, you can use cardboard, plastic, and all that will come up.
На фото ниже видны все три слоя сумочки: плащёвка, плёнка, хлопок
In the photo below you can see all three layers handbags: raincoat fabric, film, cotton
Вырезаем необходимое количество деталей, смётываем вместе. Должно получиться: два круга одного диаметра, донышко в виде прямоугольной полоски и молния обшитая с обеих сторон той же тканью.При этом, ширина дна и молнии с тканью должны совпасть.
Cut the required number of parts, smetimes together. Must have: two circles of the same diameter, bottom - rectangular strip and zipper lined on both sides of the same cloth. The width of the bottom and lightning with fabric must match.
С противоположных концов молнии пришиваем будущий ремень сумки. У меня он из атласной ленты сложенной вдвое и прошитой. Концы закрепляем с помощью двух широких планок(как на фото),или сразу деталью дна.
From opposite ends of the lightning sew future bag strap. I have it from satin ribbon folded in half and sewn. The ends are fastened with the help of two wide strips(as in the photo),or just part of the bottom.
To tack and sew it to him all the details - wall future handbags. All the work we do from the inside!
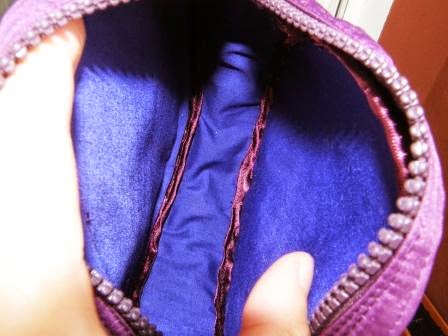
Когда будете пришивать вторую деталь, не забудьте открыть замок - молнию и вытащить лямку!
Забавный барабан получается, с зубами и языком :)
When will sew the second part, do not forget to open zip and pull the strap!
Теперь пришиваем косую бейку по швам и прострачиваем на швейной машине
Now to tack forward bake at the seams and sewing on the sewing machine
Изнутри швы обработанные косой бейкой выглядят так
Inside seams processed oblique borders look like this
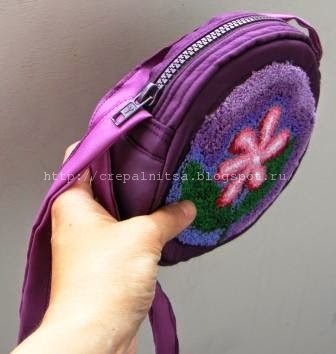
Вот и всё, выворачиваем сумочку на лицевую сторону и любуемся результатом своей работы!
That's all, remove the bag on the front side and admire the result of their work!
So, I have finished the embroidery in the carpet technique pink flower (that I wrote herehttp://crepalnitsa.blogspot.ru/2014/05/russian-punchneedle-embroidery.html), in a box of tissues was raincoat fabric suitable colour, and in shop "Flap" zipper, satin ribbon and bias binding. A little searching, I found the material for lining - regular blue cotton and film for rigidity. Instead of film, you can use cardboard, plastic, and all that will come up.
На фото ниже видны все три слоя сумочки: плащёвка, плёнка, хлопок
In the photo below you can see all three layers handbags: raincoat fabric, film, cotton
Вырезаем необходимое количество деталей, смётываем вместе. Должно получиться: два круга одного диаметра, донышко в виде прямоугольной полоски и молния обшитая с обеих сторон той же тканью.При этом, ширина дна и молнии с тканью должны совпасть.
Cut the required number of parts, smetimes together. Must have: two circles of the same diameter, bottom - rectangular strip and zipper lined on both sides of the same cloth. The width of the bottom and lightning with fabric must match.
С противоположных концов молнии пришиваем будущий ремень сумки. У меня он из атласной ленты сложенной вдвое и прошитой. Концы закрепляем с помощью двух широких планок(как на фото),или сразу деталью дна.
From opposite ends of the lightning sew future bag strap. I have it from satin ribbon folded in half and sewn. The ends are fastened with the help of two wide strips(as in the photo),or just part of the bottom.
Должен получиться вот такой обруч с лямкой
Should be like this "ring" with shoulder strap
Примётываем и пристрачиваем к нему круглые детали - стенки будущей сумочки. Все работы делаем с изнаночной стороны!To tack and sew it to him all the details - wall future handbags. All the work we do from the inside!
Когда будете пришивать вторую деталь, не забудьте открыть замок - молнию и вытащить лямку!
Забавный барабан получается, с зубами и языком :)
When will sew the second part, do not forget to open zip and pull the strap!
Теперь пришиваем косую бейку по швам и прострачиваем на швейной машине
Now to tack forward bake at the seams and sewing on the sewing machine
Inside seams processed oblique borders look like this
Вот и всё, выворачиваем сумочку на лицевую сторону и любуемся результатом своей работы!
That's all, remove the bag on the front side and admire the result of their work!


